1. Picking your area

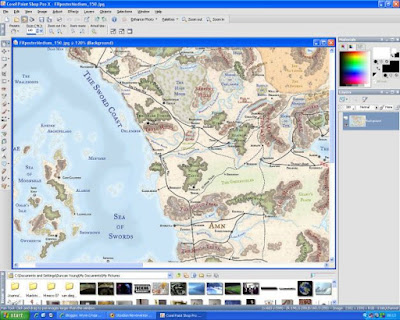
Most people will know the FR setting so I'll work with that as a base. The image above takes you to a whole atlas of the Realms, and is a handy starting point. (Note, images you crop fromthis will be small but good enough for tracing later...) Obviously, any scanned image of your sketches of a custom campaign setting map will work too. Now let's pick somewhere you'll recognise...

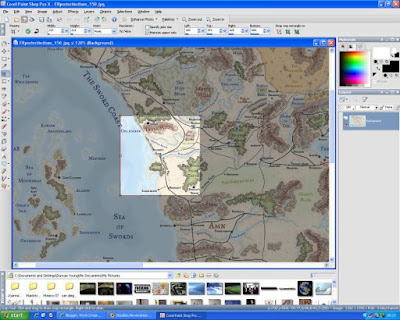
OK, this image might be small, but it shows the region on the Sword Coast just north of Baldur's Gate, leading up to the Troll Hills. Let's say I'm starting a campaign set in BG, and the sidequests will take me into the surrounding areas. I use Paint Shop Pro for my image work, but any editor, and some downloadable online options will do. So first, we go about selecting the image to make into a vfx stencil. When selecting the region to crop form the larger map there's a few things to bear in mind
- Decide which features in the map are key to be included. Here I know I want the Troll Hills and Baldur's Gate, but it might be that you wants to use the map for travel between specific cities (BG, Beregost, Nashkell)
- These factors will influence the size/shape of the overland map you want to make. Play around with the cropping tool to find a shape that seems to fit your needs and includes the area features you want. Here, a square area suits me best
- Exterior areas in the toolset are built in blocks of 4. Now, you'll want to keep the proportions of the image in line with the proportions of the area you intend to use. For square areas, as long as all sides of your cropped image are equal, this isn't a problem. For rectangular areas, you will want to make sure the area has the same relativedimensions. For example, if the region you want to cover is rectangular, dimensions 107 pixels by 245 pixels, round this to 100 x 250 (2:5 ratio), and crop out an image of those dimensions. This would then be usable on a rectangular exterior area that is 8x20 (still 2:5 ratio). Now, some of this isn't strictly necessary to get exact, so if you get bogged down on this, then just select an image and move on
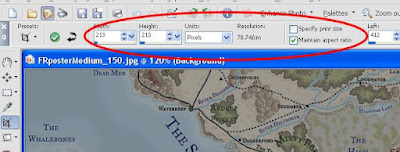
Once you have the image in the right proportions, save it in TGA (Truevision Targa) format. I'm going to stick with this for now as most people can get means to save in TGA format, but DDS format will also work.
2. Making the traceable map
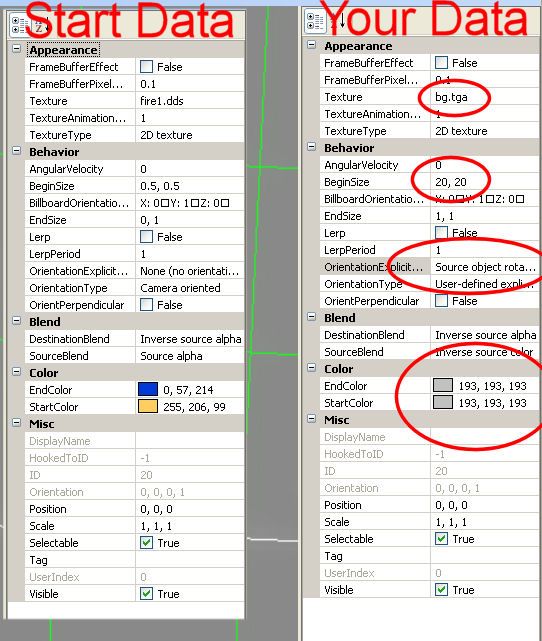
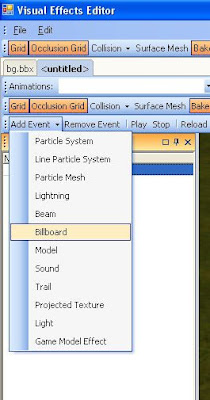
So now, we go to your module in the toolset. If you are working in directory mode (or mod mode you can use the temporary directory) then put the TGA image into your module name directory. Note that if you save files into your module directory in direcory mode, they ill be packaged into the mod file if you later save as a mod, but still be available in game. Alternatively, in Campaigns, you can place it in your campaign folder. Now in the toolset we need to open up the Visual Effect Editor under the plugins menu. This comes with the game. You'll be wanting to create a new billboard fx

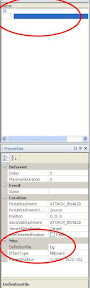
Below are the settings you'll want to update - your file name in the texture, the begin size to 20,20 (more on this in a second), Orientation to User-defined/SourceObjectRotation, and Source colour to grey (this puts a tint on your image - grey at 25% keeps the image visible but not too bright)
Now save the file as
All you need to do now is select that in the name menu (these don't have default labels so they're just blank entries for now - you can add labels if you wish), and enter
Now press 'Play' and you'll see your map appear at the feet of the human in the preview pane. Notice how the image fills one square of the quadrant.

3. Using the tracing map in the toolset
Open up your module, and the area you want to designate as your overland map. For simplicity, place an AltarGen placed effect at the Centre of your map (Note: you can use the position no snap feature in the properties to align this exactly if you wish). You might want to set the height of the placed effect jst off the ground - nudge up with the PageUp button, then Height/Position-lock.
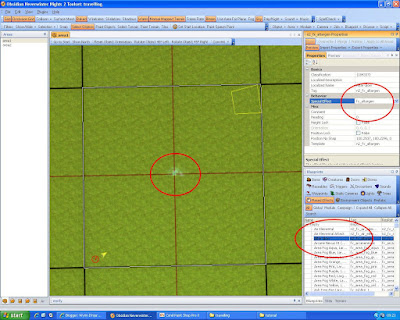
Then set the SpecialEffect listed in the properties for the one you have just placed to your saved SEF file from earlier. Et voila, your map should appear, nicely scaled to your area.
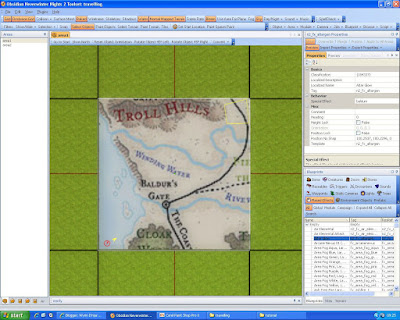
Now all that remains is to trace out the features in the terrain options with the colour tool. I use Green for the outline of woods, black for roads, brown for mountains and blue for water. Even put some city placeables down to help mark out their location. For mountains, you might also want to draw out the line corresponding to their peak hight as well as their outline - this helps when raising the terrain and putting snow texture on later. If the map effect is height locked you can star to raise/lower terrain too, and see how this nestles in on your map - see my previous blog post for examples. The image below shows how I've quickly droawn in the Troll Hills. In the Show/Hide toolbar button, you can flick the map effect on/off to see your handiwork. Remember the beauty of the colour tool is that white erases all your mistakes.

General Overland comments
- Roads seem to be about a 3 diameter on the terrain brush
- Camera distance is how high the camera sits above the player
- Camera pitch is how the camera is rotated on the up/down axis - bascially what angle you look down on the PC and the rest of the world. 40 seems good for this
- Camera Yaw is how the camera is roated on the left/right axis.
- The shape of the map you choose will effect the best camera angle for you. If the player is mostly travelling along the North-south axis, then a yaw of zero is fine. but if the travel is more east west, you might want either 90 or 270.
I'll upload a sample module soon covering this, along with another system I've been playing with - Map Travel a la Indiana Jones. A simple heartbeat script to add to Overland maps to create a trail of red dashes behind the player as they move - something I always liked in the Indy movies, and could be used for simple map travel in NWN2

Hope that's made some things clearer - let me know and I can edit in some further explanations

5 comments:
Heh, interesting technique. Never thought about doing it that way. :)
Goodness me! I had no idea!
Thank-you for sharing this information. I always struggled with the SEF stuff anyway, but having you explain it in a step by step process like this gives me some hope. :)
I will keep a close eye open for the mod you mentioned. And now you have said time may be accounted for in the new SoZ maps, I may have to look into that as well.
I have just spent the last couple of days looking at the NWN and NWNX1 map systems again as well. I have managed to work them out some more now and will use both for different reasons. If I can get to grips with the SoZ version (and time is accounted for), then I may even have all three mapping systems in the campaign. ;)
Thanks again for sharing. I will have to remember to send a link to this page from my own blog at the next write up. :)
Lance.
That is a very clever technique, Wyrin. Thanks for sharing it. :)
@ wjsd
glad this was of some use, and you figured it out
another option sugested over at the citadel is to use a projecting vfx instead of a flat billboard - i thinnk it's just a matter of changing options.
And I thought I was going to be super clever and all the ladies would love me since I just figured out I could do this..... Darn you Wyrin!
Post a Comment